고객 서비스

판매자들은 가입하면 더 많은 혜택을 누릴 수 있습니다.

모든 주문 무료 배송.

자동차 전자 장비

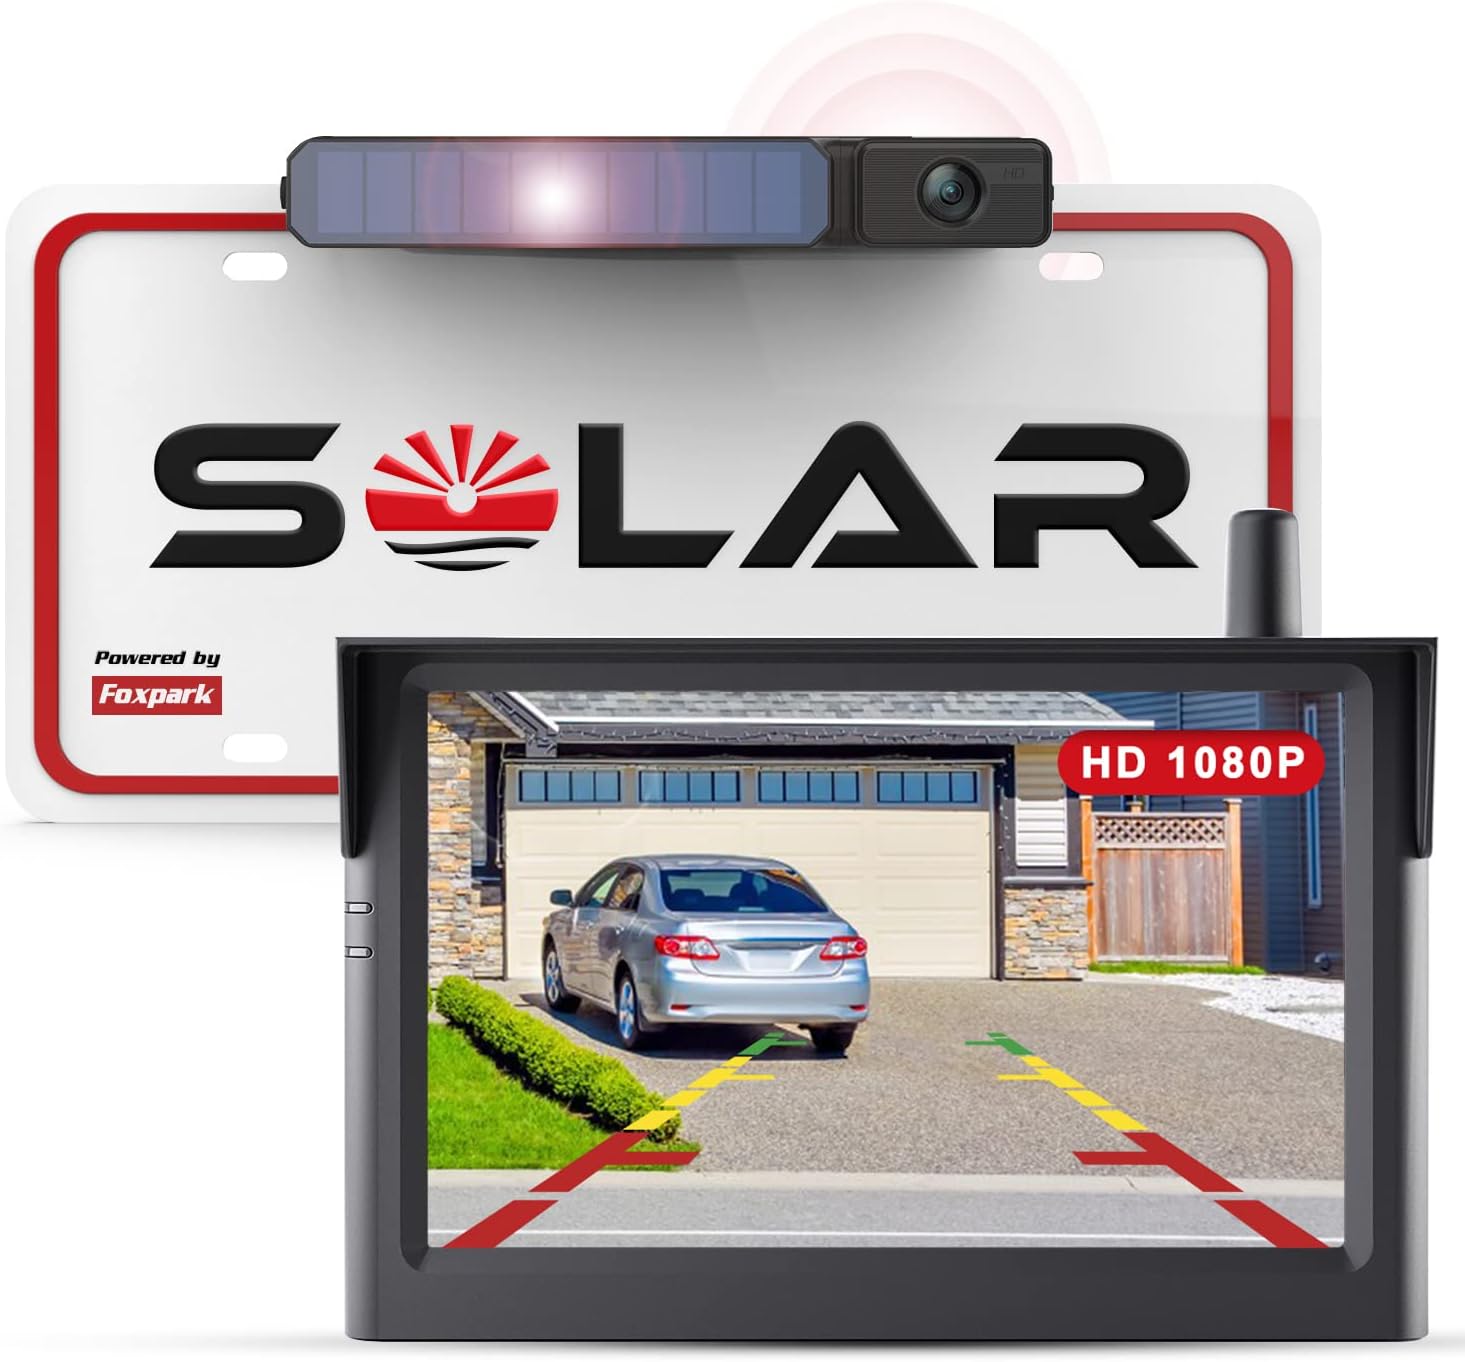
Solar Wireless Backup Camera, 1080P 5'' Monitor Back Up Camera Systems Wireless, 3 Mins DIY Installation, Reverse Camera for Car, Truck, Van, RV

4.30

지난 32시간 동안 판매됨 21

$ 139.99
$ 144.00
-2.86%

I have a base model 2015 NIssan Altima and it doesn't have a back up camera. I have driven other vehicles that had this and it always helped me. I have depth perception issues and I don't back into parking spaces and sometime I have to adjust my parking even when I am pulling forward. I have a hard time judging whether I am in fully inside my garage and have had my garage door hit the back of my car a couple of times cause I didn't pull in fully. I didn't want to pay thousands of dollars to have my console upgraded and a backup camera installed and so I went searching for a wireless option. The only problem is that even though most of them are wireless they still require you to wire into your reverse light in order to work and this was out of my skill level. I wanted something I could install easily and didn't require any wires. I stumbled upon the solar options and after many reading many reviews, I finally decided on this option. The shipping was fast and when I got home from work on the day that I received it, I started to install the unit. Now, for people who know exactly what they are doing, this is probably a 10 minute install but I went in with several assumptions and that delayed the install.First, I thought I was going to be able to install the camera onto the license plate at the top; however, my license plate is located in a recessed area of the truck and is already situated close to the top where the trunk release button and so if I placed the camera there, I would never be able to open my trunk. (I attached a photo that where I circled the truck release so you can see how close it is to the top of the license plate).Second, my car didn't come with holes for the bottom of the license plate so I was unable to have it secured to the bottom part of my license plate as well. I was thinking I would have to send this back but then I remembered the sticking strip that was sent with the camera. This was actually a better option for me since it allowed me to affix the camera to the right of center which actually put the camera part itself almost dead center of the car. I attached a couple of photos to show the camera on the bottom and how the actual camera part is almost center.I removed the license plate completely, cleaned the entire area and dried it completely. Determined the placement of the sticker and then applied it. I then placed the camera still attached to the bracket onto the sticker and held it in place for a few minutes. I then cleaned off the license plate itself and replaced it.I then moved onto figuring out the placement for the monitor. I have a non textured area directly above my console that I initially tried to place the monitor; however, that area is slanted and the monitor wouldn't stick. It kept falling off! The instructions state to place it on a non-textured flat surface. The rest of my dashboard is textured but I have more options of a flat surface. Placing it on the windshield is not an option for me because then I wouldn't be able to use my sunshades in the summer time. So I found a place that was in line with the driver's view and it was a little farther back where it was flat and although it was a textured surface - it stuck! And I mean it stuck solid! After I placed it on the flat area, I had decided I was going to adjust the position just a little but it was so solid that I decided to leave it alone. After watching several YouTube videos, I was able to figure out how to pull the trim off my dashboard which allowed me to hide the extra cable behind my radio and a small hole was just above the area where my cigarette lighter. You can see from the photos I attached that only a small portion of the cable from the monitor is visible where the monitor is at and down where the product plugs into the cigarette lighter.So I put several objects behind my car at different distances and with the help of my son, it allowed me to adjust the camera to the proper level. I have been driving for over a week with this product installed and I just LOVE it!. I no longer have anxiety pulling out of a parking spot and hoping there is enough distance between me and the cars parked on the other side. I backed into my garage for the first time and it was a breeze. When I pull forward into my garage, I no longer have to get out of the car to see if I have pulled in enough to clear the door, I just hit the monitor and line up the grid line to the line on the cement that separates the garage from the driveway and viola, I am in with no problems. The grid lines are slightly off on one side because the camera isn't dead center. (I wish now I would have installed it more center than I did but the sticky stuff they sent works really well and I'm not getting it off to readjust the camera). After driving with this product and the installation issues that I ran into, I have a couple of suggestions for those of you who are like me.Before the product arrives, visually look at where your license is at and determine how much space you have between the top of your plate and the trunk release and also if you have holes in the bottom to mount there if needed. This product is bulky. Also look for flat area on your dash board to mount, flat is more important than smooth texture. IF I had done this before hand, I would have saved a ton of time when I went to install it.My next suggestion is based on my need for accuracy of the grid lines. I would highly suggest to avoid mounting the camera onto the license plate with the screws because that puts the camera itself on the side and thus the grid lines will not be accurate. If you are after a cleaner look or don't rely on the grid lines to park/maneuver then this suggestion will not apply to you; however, if you don't mind the look of the product being off center or need accuracy for the grids, then use the sticking tape that comes with the product and mount it where the camera will be dead center. As I said before, I wish I had mounted it a little farther over than I what I did so that the camera would have been center but that ship has sailed cause its stuck so well that I can't move it! Also, my cigarette lighter area is down in a recessed area of the console and I found that I had to lean forward quite a bit in order to hit the button to activate the monitor. So I went ahead and purchased a splitter that brought the power button up out of the recessed area. It not only made it easier for me to reach the power button of the monitor but it also gave me another cigarette lighter port for other devices that require that. You can actually see that splitter in the photo where I am showing the wire under the console. I would suggest getting a splitter if your cigarette lighter area is a little out of your reach. I have placed the URL here for anyone who wants to know. (https://www.amazon.com/dp/B07FDQLL7K?psc=1&ref=ppx_yo2ov_dt_b_product_details).I am so happy with this purchase and if I ever get another vehicle that doesn't have a backup camera, this is going to be my first purchase for that vehicle! If you are after something easy to install, easy to use, and doesn't cost you your first born to get - then get this camera! Highly recommend!

18 현재 누군가가 웹사이트를 탐색 중입니다.

Size
7.2 Inch-Single Cam 5 Inch-Single Cam 7.2 Inch-Dual Cam
수량:
- +

예상 배송 시간: 12~26일(국제), 3~6일(미국)

구매일로부터 45일 이내에 반품이 가능합니다. 관세 및 세금은 환불되지 않습니다.

  • ASIN:

    B09Y5MVFN4

  • BATTERIES:

    1 Lithium Ion batteries required. (included)

  • BEST_SELLERS_RANK:

    #18,112 in Electronics (See Top 100 in Electronics) #117 in Vehicle Backup Cameras

  • COLOR:

    Black

  • CUSTOMER_REVIEWS:

    4.3 4.3 out of 5 stars (2,507) 4.3 out of 5 stars

  • DATE_FIRST_AVAILABLE:

    April 17, 2022

  • DISPLAY_TECHNOLOGY:

    LCD

  • ITEM_MODEL_NUMBER:

    Solar 3

  • ITEM_WEIGHT:

    2.06 pounds

  • MANUFACTURER:

    Foxpark

  • OTHER_DISPLAY_FEATURES:

    Wireless

  • PRODUCT_DIMENSIONS:

    9.45 x 7.06 x 2.76 inches

  • SPECIAL_FEATURES:

    wide angle view,reversing and driving safety,IP69 waterproof, good quality and durable wireless backup camera, 5 Inch monitor, HD1080P,user manual, color and clear image,rearview backup camera,adjust brightness/contrast/saturation,flip mirror/normal image, DIY guidelines, easy to setup,solar and USB powered,3 mins installation,transmission distance within 33ft,support 2 cameras

  • WHATS_IN_THE_BOX:

    Reversing camera

안전한 결제를 보장하세요
제품 상세 정보
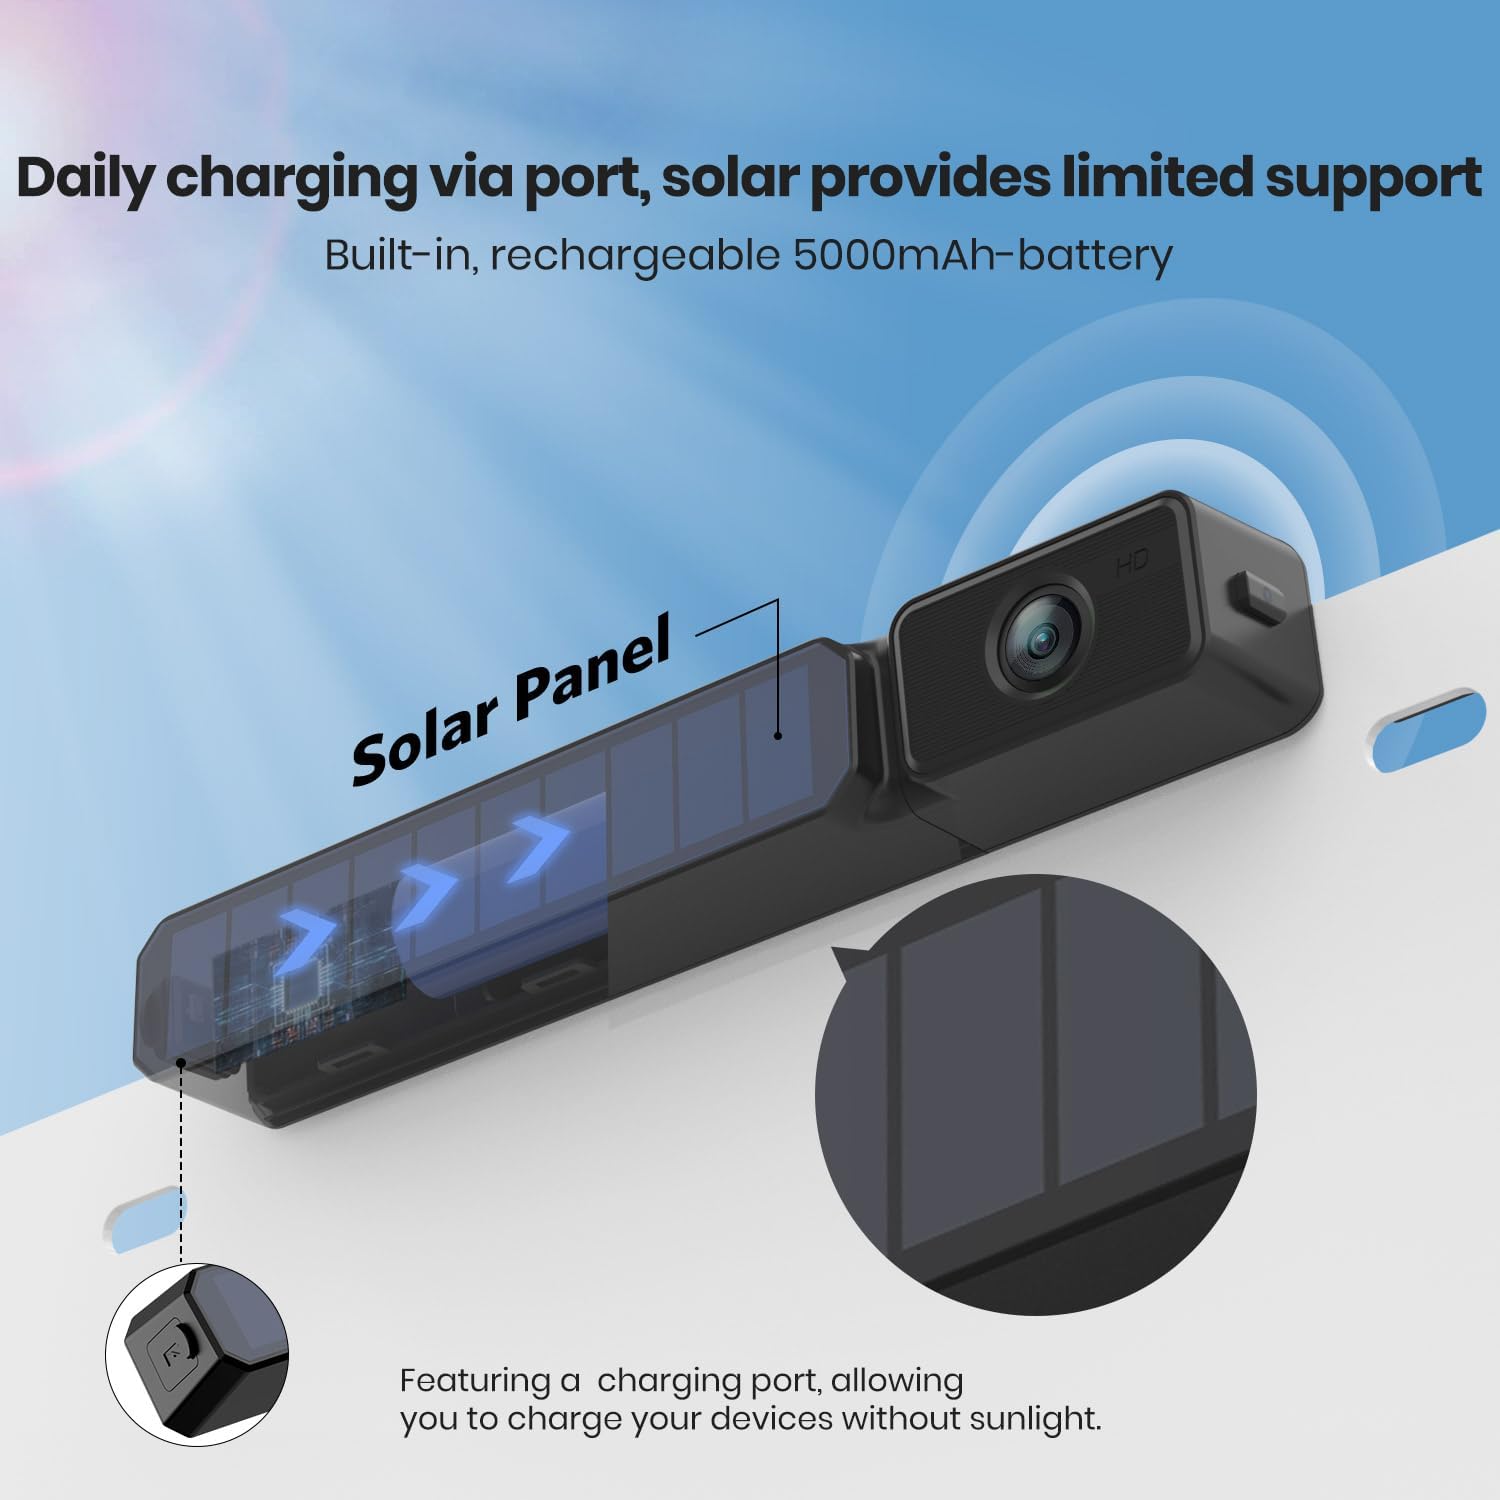
What does the 3rd Gen. solar backup camera upgrade: Used as rear view camera, Solar 3 is easy to mount behind the license plate: Step 1: Snap into the license plate Step 2: Tighten the screw, then done! *Tips: 1. Solar 3 can be 70 degree adjusted to get the best view angle. 2. The bracket of Solar 3 is mounted behind the license plate. It will not cover any information here. Solar 3 back up camera kit is developed with 1080P image sensor and FHD 5 inch LCD screen. It gives you more delicate and comfortable images, especially in low-light environments. True-to-life image actually brings you better experience than 480P, 720P. Beside of parking car, the higher-definition image allows you to use it as monitor camera to observe puppy/children in the vehicle. Enjoy Foxpark technology!
고객 리뷰
4.30

(100 점수)

5
7
4
4
3
6
2
16
1
67
댓글 취소
댓글을 남겨주세요

20 논평

Article parfaitement décrit par le vendeur.
2026-02-11    -Jean-Pol Blocteur

Article parfaitement décrit par le vendeur, fonctionne très bien, très pratique à voir dans le temps maintenant.

Fantastic purchase, go for it
2026-03-01    -Prabh

I'm blown away by this solar-powered backup camera! The 7.2-inch HD monitor is crystal clear, and the installation was a breeze - literally just 2 minutes! The dual antennas ensure a smooth, delay-free feed, and the IP69K waterproof rating gives me peace of mind. The DVR recording feature is a bonus. Perfect for my truck, and I'd definitely recommend it to anyone looking for a reliable, easy-to-install backup camera system. Five stars!!

I have a base model 2015 NIssan Altima and it doesn't have a back up camera. I have driven other vehicles that had this and it always helped me. I have depth perception issues and I don't back into parking spaces and sometime I have to adjust my parking even when I am pulling forward. I have a hard time judging whether I am in fully inside my garage and have had my garage door hit the back of my car a couple of times cause I didn't pull in fully. I didn't want to pay thousands of dollars to have my console upgraded and a backup camera installed and so I went searching for a wireless option. The only problem is that even though most of them are wireless they still require you to wire into your reverse light in order to work and this was out of my skill level. I wanted something I could install easily and didn't require any wires. I stumbled upon the solar options and after many reading many reviews, I finally decided on this option. The shipping was fast and when I got home from work on the day that I received it, I started to install the unit. Now, for people who know exactly what they are doing, this is probably a 10 minute install but I went in with several assumptions and that delayed the install.First, I thought I was going to be able to install the camera onto the license plate at the top; however, my license plate is located in a recessed area of the truck and is already situated close to the top where the trunk release button and so if I placed the camera there, I would never be able to open my trunk. (I attached a photo that where I circled the truck release so you can see how close it is to the top of the license plate).Second, my car didn't come with holes for the bottom of the license plate so I was unable to have it secured to the bottom part of my license plate as well. I was thinking I would have to send this back but then I remembered the sticking strip that was sent with the camera. This was actually a better option for me since it allowed me to affix the camera to the right of center which actually put the camera part itself almost dead center of the car. I attached a couple of photos to show the camera on the bottom and how the actual camera part is almost center.I removed the license plate completely, cleaned the entire area and dried it completely. Determined the placement of the sticker and then applied it. I then placed the camera still attached to the bracket onto the sticker and held it in place for a few minutes. I then cleaned off the license plate itself and replaced it.I then moved onto figuring out the placement for the monitor. I have a non textured area directly above my console that I initially tried to place the monitor; however, that area is slanted and the monitor wouldn't stick. It kept falling off! The instructions state to place it on a non-textured flat surface. The rest of my dashboard is textured but I have more options of a flat surface. Placing it on the windshield is not an option for me because then I wouldn't be able to use my sunshades in the summer time. So I found a place that was in line with the driver's view and it was a little farther back where it was flat and although it was a textured surface - it stuck! And I mean it stuck solid! After I placed it on the flat area, I had decided I was going to adjust the position just a little but it was so solid that I decided to leave it alone. After watching several YouTube videos, I was able to figure out how to pull the trim off my dashboard which allowed me to hide the extra cable behind my radio and a small hole was just above the area where my cigarette lighter. You can see from the photos I attached that only a small portion of the cable from the monitor is visible where the monitor is at and down where the product plugs into the cigarette lighter.So I put several objects behind my car at different distances and with the help of my son, it allowed me to adjust the camera to the proper level. I have been driving for over a week with this product installed and I just LOVE it!. I no longer have anxiety pulling out of a parking spot and hoping there is enough distance between me and the cars parked on the other side. I backed into my garage for the first time and it was a breeze. When I pull forward into my garage, I no longer have to get out of the car to see if I have pulled in enough to clear the door, I just hit the monitor and line up the grid line to the line on the cement that separates the garage from the driveway and viola, I am in with no problems. The grid lines are slightly off on one side because the camera isn't dead center. (I wish now I would have installed it more center than I did but the sticky stuff they sent works really well and I'm not getting it off to readjust the camera). After driving with this product and the installation issues that I ran into, I have a couple of suggestions for those of you who are like me.Before the product arrives, visually look at where your license is at and determine how much space you have between the top of your plate and the trunk release and also if you have holes in the bottom to mount there if needed. This product is bulky. Also look for flat area on your dash board to mount, flat is more important than smooth texture. IF I had done this before hand, I would have saved a ton of time when I went to install it.My next suggestion is based on my need for accuracy of the grid lines. I would highly suggest to avoid mounting the camera onto the license plate with the screws because that puts the camera itself on the side and thus the grid lines will not be accurate. If you are after a cleaner look or don't rely on the grid lines to park/maneuver then this suggestion will not apply to you; however, if you don't mind the look of the product being off center or need accuracy for the grids, then use the sticking tape that comes with the product and mount it where the camera will be dead center. As I said before, I wish I had mounted it a little farther over than I what I did so that the camera would have been center but that ship has sailed cause its stuck so well that I can't move it! Also, my cigarette lighter area is down in a recessed area of the console and I found that I had to lean forward quite a bit in order to hit the button to activate the monitor. So I went ahead and purchased a splitter that brought the power button up out of the recessed area. It not only made it easier for me to reach the power button of the monitor but it also gave me another cigarette lighter port for other devices that require that. You can actually see that splitter in the photo where I am showing the wire under the console. I would suggest getting a splitter if your cigarette lighter area is a little out of your reach. I have placed the URL here for anyone who wants to know. (https://www.amazon.com/dp/B07FDQLL7K?psc=1&ref=ppx_yo2ov_dt_b_product_details).I am so happy with this purchase and if I ever get another vehicle that doesn't have a backup camera, this is going to be my first purchase for that vehicle! If you are after something easy to install, easy to use, and doesn't cost you your first born to get - then get this camera! Highly recommend!

Fantastic purchase, go for it
2026-02-13    -Prabh

I'm blown away by this solar-powered backup camera! The 7.2-inch HD monitor is crystal clear, and the installation was a breeze - literally just 2 minutes! The dual antennas ensure a smooth, delay-free feed, and the IP69K waterproof rating gives me peace of mind. The DVR recording feature is a bonus. Perfect for my truck, and I'd definitely recommend it to anyone looking for a reliable, easy-to-install backup camera system. Five stars!!

The camera and display were easy to install and worked well for nearly eight months. However, the monitor suddenly began experiencing issues. I reached out to Foxpark, and Emma, the customer support representative, was incredibly helpful in resolving the problem. She provided me with detailed instructions to troubleshoot and identify the issue. After going through the process, we concluded that the monitor was faulty. She sent me a replacement camera and monitor within a few days, and they have been working perfectly since then. I really appreciate the clarity of the images, and it even performs well at night. Overall, the product is great, but the standout aspect of this purchase has been the exceptional customer support, especially from Emma.

5.0 out of 5 stars Best backup camera!
2026-02-18    -George Berry

Great camera, we use it on our C class motor home. It was very easy to install . The camera is very clear. The solar charging is the best. I have not needed to charge it ever. Sometimes the motor home sits for a month without using it. The camera is always fully charged. I highly recommend this product.

I have actually purchased two Foxpark wireless 5" backup cameras: the Solar 3 and the Solar 3B. Both were applied to vehicles without a backup camera (Mercedes R350 and a Chevy Cruze). I chose these wireless solutions because I did not want the hassle of trying to splice into the correct wiring of the tail lights and backup lights. This solution is so easy to install. The camera fits over most standard rear tag assemblies. (I did have to slightly modify the one for the Mercedes). The solar panel helps to ensure the battery stays charged. The receiver unit includes the 5" display which simply plugs into an auxiliary port and syncs quickly with the sender tag unit camera. When plugged in, it will come on automatically as soon as you first crank the car (sends the power signal through your aux port). Otherwise, turning on and off is as simple as a click of button (literally) at the auxiliary port. (Pretty cool to turn it on whilst driving and see what's behind you). It's a very reliable product.Let me also tell you about the customer service. The first unit I purchased (the Solar 3) would not initially charge. It would come on while plugged into a USB to charge, but once disconnected, it went dead. I communicated with the Foxpark team and after a few messages, they agreed to send me a replacement camera unit, which was received within 3 days and once received, took the charge and has been working brilliantly ever since.I've had both of these cameras since SEP 2024, so it's now been about 4 months and they continue to work as expected. I would highly recommend these units for cars looking for a wireless solution, granted you have plenty of room for the additional 5" display unit in your vehicle.

Article parfaitement décrit par le vendeur.
2026-01-05    -Jean-Pol Blocteur

Article parfaitement décrit par le vendeur, fonctionne très bien, très pratique à voir dans le temps maintenant.

Great product - great customersupport.
2026-01-21    -Jeru J.

I am very happy with the Foxpark camera. It works straight out of the box. The picture is clear and I had no interference issues whatsoever. The camera recharges itself. After 8 months or so the screen died. I reached out to Foxpark and they solved the issue fast by providing a new unit under warrenty. I have to say I was pleasantly suprised: they offer excellent customerservice. Friendly, quick replies and good solutions.I can recommend Foxpark wholeheartedly.

Great product - great customersupport.
2026-02-10    -Jeru J.

I am very happy with the Foxpark camera. It works straight out of the box. The picture is clear and I had no interference issues whatsoever. The camera recharges itself. After 8 months or so the screen died. I reached out to Foxpark and they solved the issue fast by providing a new unit under warrenty. I have to say I was pleasantly suprised: they offer excellent customerservice. Friendly, quick replies and good solutions.I can recommend Foxpark wholeheartedly.

댓글을 남겨주세요:

댓글 제목
댓글 내용
배송 및 반품
우리가 당신을 보호하겠습니다

대부분 지역에서는 배송비를 한 번만 지불하시면 됩니다 (주문 및 배송 페이지를 확인해 주세요).

구매 후 14일 이내 무료 반품 가능 (단, 수명이 다한 제품, 맞춤 제작 상품, 마스크, 향수 및 에어로졸과 같이 위험하거나 인화성 물질이 포함된 일부 제품은 제외).

수입 관세 정보

복잡한 절차는 저희가 처리해 드리겠습니다. 카나리아 제도를 제외한 모든 EU 국가, 영국, 미국, 캐나다, 호주, 뉴질랜드, 푸에르토리코, 스위스, 싱가포르, 한국, 쿠웨이트, 멕시코, 카타르, 인도, 노르웨이, 사우디아라비아, 대만, 태국, UAE, 일본, 브라질, 맨섬, 산마리노, 콜롬비아, 칠레, 아르헨티나, 이집트, 레바논, 홍콩 특별행정구, 바레인, 터키로 배송되는 상품 가격에는 모든 수입 관세가 포함되어 있습니다. 표시된 가격이 최종 결제 금액입니다.

예상 배송 시간

특급 배송: 7-10일

해당 창고에서 배송되었습니다.

더 자세한 정보가 필요하신가요?
반품 정책
반품 정책

저희는 제품 품질에 자신 있습니다. 만약 구매하신 제품에 완전히 만족하지 못하신다면, 수령일로부터 30일 이내에 간편하게 반품하실 수 있도록 정책을 마련해 두었습니다.

간편한 교환 또는 환불
  • 다른 사이즈, 색상 또는 스타일의 상품으로 교환하거나 전액 환불받을 수 있습니다.
  • 반품되는 모든 상품은 착용하지 않은 상태여야 하며, 원래 포장 상태 그대로 모든 태그가 손상되지 않은 상태여야 합니다.
간단한 절차
  • 온라인으로 반품을 신청하거나 고객 서비스 팀에 문의하여 도움을 받으실 수 있습니다.
  • 물품을 제대로 포장해 주시고, 원래의 포장 목록도 함께 넣어주세요.
  • 반품하실 상품을 보내주실 때에는 저희가 제공해 드린 선불 배송 라벨을 사용해 주시기 바랍니다.
  • 환불 요청 접수 즉시 처리해 드리겠습니다.

반품과 관련하여 궁금한 점이나 우려 사항이 있으시면 언제든지 저희 전문 고객 서비스 팀에 문의해 주세요. 고객 만족은 저희의 최우선 목표입니다.

범주
차이
제품
모든 제품 지우기